Search  for anything...

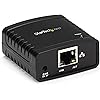
StarTech.com 10/100Mbps Ethernet to USB 2.0 Network Print Server - Windows 10 - LPR - LAN USB Print Server Adapter (PM1115U2)

  • Based on 1,065 reviews
Condition: New
Checking for product changes
$51.71 Why this price?
Save $11.28 was $62.99

Buy Now, Pay Later


As low as $8.62 / mo
  • – 6-month term
  • – No impact on credit
  • – Instant approval decision
  • – Secure and straightforward checkout

Ready to go? Add this product to your cart and select a plan during checkout. Payment plans are offered through our trusted finance partners Klarna, PayTomorrow, Affirm, Afterpay, Apple Pay, and PayPal. No-credit-needed leasing options through Acima may also be available at checkout.

Learn more about financing & leasing here.

Selected Option

Free shipping on this product

This item is eligible for return within 30 days of receipt

To qualify for a full refund, items must be returned in their original, unused condition. If an item is returned in a used, damaged, or materially different state, you may be granted a partial refund.

To initiate a return, please visit our Returns Center.

View our full returns policy here.


Availability: In Stock.
Fulfilled by Amazon

Arrives Sunday, Jun 9
Order within 5 minutes
Available payment plans shown during checkout

Model: USB Print Server


Features

  • SHARE A PRINTER: Share a USB printer w/ multiple users over an Ethernet network; The print server has 10Base-T/100Base-TX auto-sensing to ensure a reliable connection, letting you print from any network computer, across the office or over the Internet
  • DETAILED INSTALLATION STEPS: Perform initial setup following our online step-by-step instructional video or user manual; Access the online FAQs and IT Pro Community for additional helpful tips and instructions
  • GREAT FOR ANY ENVIRONMENT: This USB print server adapter is the perfect printing solution; Ideal for home or small office applications, and government and educational institutions that require shared printing capabilities
  • BROAD COMPATIBILITY: This USB to Ethernet print server is USB 2.0 compliant, and works w/ Mac & Windows; The print adapter also supports LPR network printing and Bonjour Print Services to provide ultimate compatibility
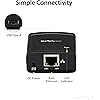
  • PRINT FROM ANYWHERE: Print from any computer connected to the LAN; This print server doesnt require a wired connection to a computer, however you must connect the server to your networking device (eg. router) w/ the included RJ45 network cable

Description

This 10/100Mbps Ethernet to USB 2.0 network print server makes it easy to share a USB printer with multiple users on your network (LAN). Reliable Network Printing This USB 2.0 10/100Mbps print server lets you share one USB printer with multiple users on your LAN instead of having separate printers for each workstation. You can use this printer adapter with many devices including a laptop, desktop computer or scanner if they´re sharing the network with the print server. With web-based management, you can set up and monitor the networking USB print server through a web browser, so you can place your printer at any convenient shared location. Detailed Installation Steps Perform initial setup following our online step-by-step instructional video or user manual; Access the online FAQs and IT Pro Community for additional helpful tips and instructions. Plus, it´s compatible with most standard USB printers and can be used with Mac or Windows operating systems, including Windows 10. Supports LPR Network Printing and Bonjour Print Services The printer server supports the Line Printer Remote (LPR) protocol which enables Internet printing. It also supports Bonjour Print Services, making it easier to find and configure printers on your network. This Ethernet to USB network print server is backed by a2-year warranty and free lifetime technical support.


Brand: ‎StarTech


Connector Type: ‎Usb


Cable Type: ‎USB, Ethernet


Compatible Devices: ‎PC, Mac


Color: ‎Black


Connector Gender: ‎Male-to-Male


Data Transfer Rate: ‎100 Megabits Per Second


Unit Count: ‎1 Count


Item Weight: ‎0.06 Kilograms


Connectivity Technology: ‎Network (RJ-45), USB


Series: ‎10/100Mbps Ethernet to USB 2.0 Network LPR Print Server


Number of Items: ‎1


Package Type: ‎Standard Packaging


Number of USB 2.0 Ports: ‎1


Item model number: ‎PM1115U2


Hardware Platform: ‎PC;Mac


Item Weight: ‎2.18 ounces


Product Dimensions: ‎2.1 x 2.1 x 0.9 inches


Item Dimensions LxWxH: ‎2.1 x 2.1 x 0.9 inches


Voltage: ‎240 Volts


Manufacturer: ‎StarTech.com


Country of Origin: ‎China


Is Discontinued By Manufacturer: ‎No


Date First Available: ‎November 26, 2015


Frequently asked questions

If you place your order now, the estimated arrival date for this product is: Sunday, Jun 9

Yes, absolutely! You may return this product for a full refund within 30 days of receiving it.

To initiate a return, please visit our Returns Center.

View our full returns policy here.

  • Klarna Financing
  • Affirm Pay in 4
  • Affirm Financing
  • Afterpay Financing
  • PayTomorrow Financing
  • Apple Pay Later
Leasing options through Acima may also be available during checkout.

Learn more about financing & leasing here.

Top Amazon Reviews


  • Incredibly Hard to Install
Model: Wireless USB Print Server
UPDATE: I recently wrote a 1 Star review where I noted that after several frustrating hours of trying to install this Startech Print Server (SPS), I finally gave up. However, while waiting for a return authorization, I started researching comparable units from other companies and quickly discovered that they are apparently all hard to install and many have other issues that make them less desirable than the Startech. So, I decided to try the install again, and this time I finally succeeded. The hardest part of my install was getting the SPS to connect wirelessly to my router. I will cut to the chase and tell you that the easy way to do this is to push the WPS (Wi-Fi Protected Setup) button on your router, then push the small black WPS button on the front of the SPS, wait a few minutes while the lights blink and “VOILA!!!” your SPS will be wirelessly connected to your network router. This simple procedure, which isn’t mentioned anywhere in the Startech instruction manual or on their support website, could have saved me hours of frustration trying to make this connection with both the supplied software and the instructions on the Startech support website. I discovered it purely by accident. Hopefully, your router has a WPS button (most modern routers do) and this will work for you. If not, please know that the installation manual and software provided with the SPS unit are beyond useless. I wouldn’t even bother installing the software, it is a waste of time and disk space. In fact, by searching the Startech support website, I learned that some of the information in the paper manual, such as the reset procedure, is WRONG. If you don’t have a WPS button on your router, my best advice is to go to the Startech website, click on the “support” tab and go to the support page for model PM1115UW. Scroll down to the FAQ section and follow the instructions for your computer operating system. Good luck! You can confirm that the SPS is wirelessly connected to your router by “pinging” the SPS from your computer. To “ping” the SPS, press the “Windows key + R”. this will bring up a black and white command box. Type cmd and press Enter. Then type ping followed by one space and the IP address listed on the bottom of your SPS. For example, type ping 198.162.0.10. If the ping is successful, you should get a response from the same IP number that you entered. If you get a response from any other IP you are NOT communicating with the SPS. In my case, I initially could successfully ping the SPS if it was hard wired to my computer with an Ethernet cable, but not wirelessly. However, after the WPS procedure, I could successfully ping the SPS wirelessly. Once the SPS is wirelessly connected to your router (ping is successful), the final step is to install the printer on your computer. This process is also a bit involved. There are instructions on the Startech support website, but they are not easy to find, so I will repeat them for you here. 1. Press the “Windows” key and select “Settings” (the gear-like icon on the lower left of your screen). 2. Click “Devices>Printers and Scanners>Add a Printer”. 3. Windows will now search for available printers but won’t find your SPS. 4. Click “The printer I want isn’t listed” after it appears. 5. Select “Add a local printer or network printer with manual settings” > Next. 6. Select “Create a new port” and change the “Type of port” to a “Standard TCP/IP Port” > Next. 7. In the “Hostname or IP address” box, type in the IP address of the SPS (it is on the bottom of the unit, the default IP is 198.162.0.10) > Next. 8. Click “Custom>Settings>LPR”. Under “LPR Settings” enter a “Queue Name”. This is whatever name you want to identify the printer connected to your SPS, and it can be any set of letters and/or numbers. It is the name that will later appear in your list of available printers. Click “OK” > Next. 9. Select the best available driver for the printer connected to your SPS. You may need to click the Windows refresh to get a more complete list of printers (it takes several minutes to do the refresh). If you can’t find your exact printer, choose the closest available match. 10. Keep clicking Next until you are asked to send a test page to the printer to confirm that the printer was successfully added. Hopefully, that page will print, and from then on, your printer will show up on your computer in the list of available printers. You will probably need to repeat this “add a printer” process once on each computer that you want to access the SPS. I truly hope that this help others avoid the issues I had installing the Startech Print server. You might also be able to get help from the tech support people at Startech, but they were closed while I was going through all of this, so I can’t speak to how helpful they might be. I have now raised my rating to 2 Stars because, once installed, the SPS is working fine. However, the install was far more painful than it needed to be. Original Review I seldom write reviews, but I need to add to the warnings of others about this product. I should have heeded the warnings already posted by others. The installation of this print server is an absolute nightmare. I am not a tech genius, but I have successfully built my own computers and troubleshot computers for years, and I can normally solve a computer problem without too much hassle. But, after wasting several hours trying to get this unit to connect to my laptop or to my network it completely stopped showing up at all, and I just gave up and will hopefully send it back. Looking more closely at other reviews, including one by an experience network tech warning about a very difficult install, I should have heeded those warnings. The manual and installer software are totally useless and the unit seems to be incompatible with many modern routers, apparently including my century link router. I would strongly encourage you to look elsewhere for a better solution. I am awaiting a response from the seller about returning this useless POS. ... show more
Reviewed in the United States on March 23, 2019 by mfsmithabq

  • It works!
Model: Wireless USB Print Server
Ok, so I really wanted this product to work, I moved my PC to my family room and wanted to still be able to print to my Brother 2240D lazer printer. Got the product today, I can see that this was used previously (power supply cord was loose (no wire wrap around it), the CD Rom plastic tape was disturbed (can plainly see it), but I decided to give it a shot. Pitfall #1" The default IP for the device is 192.168.0.10 When I cabled it to my PC, I was not able to access it through the web browser till. Had to change my Eithernet TCP/IP4 setting from auto detect to a static address of: 192.168.1.50 (50 could be any number except 10) Subnet of: 255.255.255.0 Once that was done All I had to do was follow these directions: https://sgcdn.startech.com/005329/media/sets/pm1115uw-setup-guide/pm1115uw%20setup%20guide.pdf I used the "Manual" method as the software on the CD did not load the setup wizard! Just as well. You might need help from your IP provider as to the SSID (name of the 2.4G signal), this server only operates on the 2. G frequency. But you might already have that if you are using your laptop/desktop or iPad over wireless, you can look and see what you are able to use, typically you can choose between 2.4 or 5G and each has a name (that's the SSID) So, what needs to be done once you get access to the server box is that you need change the IP address to what you network is. Example, my network is 192.168.1.1, the box default is 192.168.0.10, notice the second digit from the right side, 1 and 0 respectively, they don't match but they have to! So you have to change the server box to 192.168.1.xx (xx can be something like 60, which is what I used), the subnet is still 255.255.255.0 Save/Rest and move on to the rest of the setup, although you may need to contact you IP support to get" Caution: once its reset to the new IP, you will need to go back into your Ethernet settings for TCP/IP4 and change that to 192.168.1.50 (notice the 1) Default Router number (this I absolutely needed to get from my IP) Authentication type You should already have the Password for your wireless network (that's the Security Key) Its not plug and play but its also not too complicated but you kind of need to be a bit of a "NERD" to get this done. The startech.com has a support and contact page, I remote chatted with a nice fellow that gave me the basics but I'm have no doubt that they will walk you through it. Its working well so far and hopefully will continue to do so for a long time. I learned a lot myself and if I ever change IPs, I will know what needs to be done to accommodate the print server. Its disappointing that I was not able to connect to the server box instantly after hooking up a cable to my PC, my PC should have automatically detected the IP address of the box and connected to it but I'm not a Network expert so I don't know where the fault lies for that (PC or the server box firmware) it was set to auto detect by default. But all is well, took about an hour to get it going. Bottom line, don't be afraid, the Server does work, requires a bit of knowledge but as long as you have access to your IP support and you do have chat to Startech (and phone number as well) you should be able to work through it! It was set to auto detect by default ... show more
Reviewed in the United States on August 20, 2021 by Mac

Can't find a product?

Find it on Amazon first, then paste the link below.