Search  for anything...

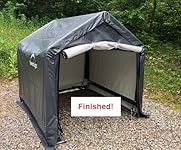
ShelterLogic 10' x 10' Shed-in-a-Box All Season Steel Metal Peak Roof Outdoor Storage Shed with Waterproof Cover and Heavy Duty Reusable Auger Anchors, grey

  • Based on 3,620 reviews
Condition: New
Checking for the best price...
$291.19 Why this price?
Save $78.80 was $369.99

Buy Now, Pay Later


As low as $48.53 / mo
  • – 6-month term
  • – No impact on credit
  • – Instant approval decision
  • – Secure and straightforward checkout

Ready to go? Add this product to your cart and select a plan during checkout.

Payment plans are offered through our trusted finance partners Klarna, PayTomorrow, Affirm, Afterpay, Apple Pay, and PayPal. No-credit-needed leasing options through Acima may also be available at checkout.

Learn more about financing & leasing here.

Selected Option

Free shipping on this product

30-day refund/replacement

To qualify for a full refund, items must be returned in their original, unused condition. If an item is returned in a used, damaged, or materially different state, you may be granted a partial refund.

To initiate a return, please visit our Returns Center.

View our full returns policy here.


Availability: In Stock.
Fulfilled by Amazon

Arrives Sunday, Sep 21
Order within 17 hours and 47 minutes
Available payment plans shown during checkout

Size: 10' x 10' x 8'


Features

  • DURABLE FRAME: Made from an all-steel metal 10 x 10 x 8-foot frame that is 1-3/8 inches thick
  • MADE TO LAST: Bonded with a premium powder-coated finish that prevents chipping, peeling, rust, and corrosion
  • WATERPROOF COVERAGE: Grey cover is durable and made from an advanced triple-layer ripstop that is waterproof and UV-treated to resist fading
  • RATCHET-TITE: Cover tensioning system ensures a drum tight cover that keeps it tight and neat looking
  • EASY SLIDE CROSS RAIL SYSTEM: Locks down and squares up frames for initial and continuous frame to fabric fit

Description

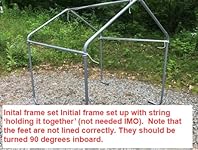
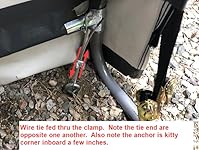
The ShelterLogic Shed-in-a-Box 10 x 10-foot outdoor storage shed has a small footprint and big value when space is at a premium. Made from an all-steel metal frame that is 1-3/8 inches, the Shed-in-a-Box is tough and durable. The metal frame is bonded with a premium powder-coated finish that prevents chipping, peeling, rust, and corrosion. Patented ShelterLock stabilizers ensure rock solid stability that delivers a secure, more durable shelter. Shed-in-a-Box is designed for use in every season and can protect your equipment from sunlight, rain, tree sap, snow, wind and more. Features the Ratchet-Tite tensioning system that ensures the cover is tight and neat looking. The cover is UV-treated inside and out with added fade blockers that results in a fabric cover that withstands the elements. With a waterproof cover made from ripstop, the Shed-in-a-Box is sure to provide protection for your items. The high profile white interior provides enhanced illumination so you can easily find what you're looking for. For privacy, one double zippered door panel and a back panel are included. Win back garage space with an affordable storage solution. With 98 square feet of storage space, the Shed-in-a-Box is great for storing garden tools, mowers, snow blowers, snowmobiles, ATVs, pool items, or anything you need to store out of sight. We recommend setting aside 6+ hours and 2+ people for assembly. With a 1-year limited warranty, you can be confident in the quality of your purchase. Assembled Dimensions: 10' x 10' x 8' Total Storage Area: 98 sq. feet Purchase Includes: (1) Steel Frame (1) Gray Fitted Cover (1) Double Zippered Door Panels (1) Back Panel (4) 15-Inch Auger Anchors Easy Step-by-Step Instructions Win back garage space or create your own storage building with this ShelterLogic portable shed-in-a-box. The shed--which offers an ideal shelter for tools, lawnmowers, or even a tractor--is tough and weather-resistant, with a heavy-duty all-steel frame bonded with a DuPont thermoset baked-on powder- coated finish. As a result, the frame resists chipping, peeling, rust, and corrosion, helping it hold up to long-term use. The cover is just as tough thanks to the triple-layer, chemically heat-bonded ripstop polyethylene cover, which is UV-treated inside and out with fade blockers and anti-aging, anti- fungal agents. The cover helps the shed and its contents withstand heavy rains, howling winds, and all the other elements Mother Nature has in store. Finally, the shed includes a Rugged Ratchet Tite tensioning system that makes setup easy while keeping the cover tight to the frame. Other features include a solid rear panel, ratchet tie-downs, auger anchors, and steel foot plates. This E Series ShelterLogic shed measures 10 by 8 by 10 feet (W x H x D).

Brand: ShelterLogic


Material: Alloy Steel


Style: Peak


Item Weight: 41 Grams


Frame Material: Alloy Steel


Water Resistance Level: Waterproof


Ultraviolet Light Protection: UV Protection


Assembly Required: Yes


Color: Gray


Manufacturer: ShelterLogic


Brand: ShelterLogic


Material: Alloy Steel


Style: Peak


Item Weight: 41 Grams


Frame Material: Alloy Steel


Water Resistance Level: Waterproof


Ultraviolet Light Protection: UV Protection


Assembly Required: Yes


Color: Gray


Manufacturer: ShelterLogic


UPC: 677599703331


Global Trade Identification Number: 31


Floor Area: 100 Square Feet


Product Dimensions: 119.65 x 117.45 x 98.2 inches


Item Weight: 1.45 ounces


Department: unisex-adult


Country of Origin: USA


Item model number: 70333


Is Discontinued By Manufacturer: No


Frequently asked questions

If you place your order now, the estimated arrival date for this product is: Sunday, Sep 21

Yes, absolutely! You may return this product for a full refund within 30 days of receiving it.

To initiate a return, please visit our Returns Center.

View our full returns policy here.

  • Klarna Financing
  • Affirm Pay in 4
  • Affirm Financing
  • Afterpay Financing
  • PayTomorrow Financing
  • Financing through Apple Pay
Leasing options through Acima may also be available during checkout.

Learn more about financing & leasing here.

Top Amazon Reviews


  • Excellent product - nightmare to assemble.
Size: 10' x 10' x 8'
The parts and cover of this product are precisely cut and shaped. Quality is excellent with some exceptions. I have an engineering background and I've assembled hundreds of items like this over my lifetime BUT, the assembly of this product was THE most frustrating experience I've had in many years. You need to have abundant patience because the precision is high and there's no room for error. Even though the manufacturer recommends two people to assemble I did it myself. Unless you have a partner that is intensely interested in understanding the instructions they would be minimally helpful. I would definitely not recommend doing this with your spouse - you may end up dodging flying tools. If you have a tendency toward profanity you'll need to keep children and neighbors out of earshot. I had to walk away from the process several times to cool down enough to resume. It took me about 8 hours to complete the assembly. When completed it was excellent. Would I buy it again? No. I'd definitely recommend it to someone that I find annoying, like the neighborhood know-it-all, but not to a friend. Here's some tips; (1) sort all of the bolts out by size - the length difference it not noticeable enough to dig them out of a pile. When the instructions call out a specific length it's for a good reason. The hardware count is exact - if you have any extra hardware left over you need to find out where it goes BEFORE you put on the covers. (2) Put some tape over the tubes before you slide them into the pockets - the ends of the tubes are sharp enough to cut the plastic. (3) If you can mount the frame to a floor of some type or concrete pad do it. Otherwise you'll spend a few hours of time walking around it moving legs back into position as you work. (4) Watch out for the ratcheting strap tighteners. They look like the tie-down straps on a boat trailer but they're poorly built, worse than any I've ever seen. (5) Watch the YouTube videos on assembly. UPDATE - It’s June 2018 and it’s pretty much as good as new. It would be as good as new if I hadn’t launched a chunk of aluminum angle through the side while using my chop saw. However I patched it with duct tape (which color matches exactly). I changed my mind, I will be buying another one but I’ll hire someone else to put it together. ... show more
Reviewed in the United States on October 23, 2016 by OtterNo

  • Assembles fine, sure to last a long time!
Size: 6' x 6' x 6'
Frist off, it’s a well-constructed unit with good quality parts. And assembly is straight forward; I did it myself in a few hours. The concern about it constantly falling apart during assembly was not my experience even though I did follow some of the recommendations to ‘tie’ it together. Was clear to me that these temporary ties were not needed due to the sung fit of the tubing. Here are the tips I suggest based on my experience in installing this at my seasonal campsite. Step 6: post squaring up the frame in Step 5, mark where to place the anchors inboard a about 4 inches from the corners at a 45-degree line from the comer. This way the anchors will (when attaching the securing lines) both ‘pull’ the frame side to side and front to back. Then move the fame over a couple of feet to install the anchors. New Step 6A: place back the frame and square it up again. Now take 4 spikes (not included) and drive them thru part 800361 which is the ‘foot’ of the frame. There are holes in this part including one at the top and bottom that will accommodate this spike and still allow the rachets in later steps to attach. The spikes will now hold the frame in place nice and square while installing the canvas. Given this you can skip over (not do) the loose wire ties to the anchors in steps 6a thru 6e. Note that I consider the supplied anchors more then adequate for my conditions. Step 7, 8 and 9: the “i” are simply telling you to NOT put the poles inside the sleeves and to NOT pull out the strap. The canvas ‘wraps’ around the frame and when you pull on the straps as you cinch it up. It will make sense once you do one panel. Step 8 and 9: you will need to pull apart select tubing joints for the straps. Having a rubber mallet will both help to get them apart and put the back together again. Step 11: the supplied rachets, while adequate, are fragile and finicky. One of mine was bent up (due to shipping damage?) so I had to pull it apart and straighten it out. Also, if needing to release the strap once tightened you may have to assist it to unwind. A screwdriver in the ‘slot’ of the wrapper core will assist in that. Additionally, the straps are too long (better then too short!). I found that cutting off about 6 inches per end left enough to properly wrap around the rachet but not fill it up to the point of overflowing and binding up. And do not forget to use a lighter to melt the end so it does not unravel. Step 11a. the hook of the rachet goes into the hole in the foot on the interior. The outside holes are for the large tarp that is installed in starting in step 12. Step 14: when placing the overall tarp and starting to tie it down, it is easy to have it too far forward or backward, so take your time and adjust as you go along. I measured the amount of ‘warp’ on the front (both left and right side) and same on back and got it as even as possible. Was about 5”. Step 14a: when putting the 2 tubes together pay attention to the holes on each end. They need to line up. While this is shown in the diagram, was not an obvious highlight. Step 17a. while the measurement shown is about correct, understand that the height and position of these cross beams dictate the both the location and the tightness of tarp. If one crossbeam is too high the other too low will result in an uneven wrap of the tarp. Once I centered the tarp, I loosened the clamps (part no. 13202) slightly and then tapped down the crossbeams with a rubber mallet to get the necessary tension. Step 18: I snaked the wire tie between the end of the crossbeam and the upright pole fishing it thru the clamp (there is room). By doing this the hold down wire is ‘trapped’ vs. being able to slide along the cross beam as it is shown in18e. Also, I fed the wire differently thru the wire clamp; i.e. instead of it being as shown in 12d. I fed the bitter ends in thru it in opposite directions. Then, after slightly tightening the nuts and using Vice-Grips, I was able pull it tight and then fully tighten the nuts. And this is where, if the anchors are at that few inches of kitty corner, it really holds the whole shelter in a good and tight fashion. And key to this are the spikes in new Step 6A, i.e. the spikes will keep the frame from pulling in when attaching the wire ties. Post all of this, need to check to ensure the door zips up without stress or being too loose. If so, pull out the spikes in the front and adjust as needed. I also when around and readjusted the rachets as needed. Overall, as great product that I expect will last a long time! UPDATE: Follow up after a couple of months, but it’s been like a couple of years! This was installed at my campsite in the Adirondack mountains in upstate NY where, like the rest of the country, we have been experiencing extreme weather conditions. Like those labs where they test things under extreme conditions to evaluate how it will hold up in the long term, we have had extreme winds as well as rain and unseasonably cold conditions this summer. How's it doing? Short answer: it like the day it was installed! Still sturdy, no rips, still taught and zero water inside (the ground can get wet from water running under it via the rocks). Recall also that I used the supplied “temporary” anchors > they were just fine for my soil conditions, but I did use spikes in the tubes as part of the set-up process and left them in. Updated from 4 to 5 Stars as a result! Door Tip. I continue to enjoy this shed but found it a little awkward to roll up the door and bungee it open > it simply does not roll up too easily. Fortunately, the bottom of the door has a pocket and a 1” PVC pipe fit it like it was made for it. And Presto! Now rolls up like a dream and easy to put on the bungees. I put end caps on the pipe after cutting it to length to keep out the critters. Note of caution: when unrolling it, guide it down to preclude it from falling and jerking the door which may eventually damage it. I used schedule 40 PVC but would have preferred schedule 10 as its slightly lighter but there was no availability in my area. ... show more
Reviewed in the United States on June 26, 2021 by Susan W. Susan W.

Can't find a product?

Find it on Amazon first, then paste the link below.
Checking for best price...