Search  for anything...

Google S3006WBUS Nest Protect, S3000BWES, 2nd Gen, Battery, 3-Pack Alarm-Smoke Carbon Monoxide Detector, 3, White

  • Based on 13,083 reviews
Condition: New
Checking for product changes
$349.95 Why this price?
Save $57.04 was $406.99

Buy Now, Pay Later


As low as / mo
  • – Up to 36-month term with PayTomorrow
  • – No impact on credit
  • – Instant approval decision
  • – Secure and straightforward checkout

Ready to go? Add this product to your cart and select a plan during checkout. Payment plans are offered through our trusted finance partners Klarna, PayTomorrow, Apple Pay, and PayPal. No-credit-needed leasing options through Acima may also be available at checkout.

Learn more about financing & leasing here.

Selected Option

Free shipping on this product

This item is eligible for return within 30 days of receipt

To qualify for a full refund, items must be returned in their original, unused condition. If an item is returned in a used, damaged, or materially different state, you may be granted a partial refund.

To initiate a return, please visit our Returns Center.

View our full returns policy here.


Availability: Only 8 left in stock, order soon!
Fulfilled by Fab4Electronics

Arrives May 12 – May 16
Order within 1 hour and 57 minutes
Available payment plans shown during checkout

Style: Battery 3 Pack


Features

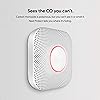
  • Smoke detector and carbon monoxide detector that speaks up in a friendly voice to give you an early warning when theres smoke or CO in your home
  • Split Spectrum Sensor looks for both fast burning and smoldering fires and tells you where the danger is
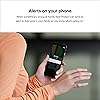
  • Get phone alerts so you know somethings wrong, even when youre away from home [1]
  • CO detector looks out for carbon monoxide and tells you where its located
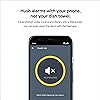
  • With App Silence, you can silence the smoke alarm with your phone in the Nest app when theres only a little smoke
  • No chirps to tell you the battery is low; Nest Protect test its own batteries and gives you a Nightly Promise when you turn off the lights so you know everything is working
  • When you walk under the Nest Protect at night, Pathlight lights your way
  • The Nest smoke and carbon monoxide alarm has sensors with a 10-year lifespan to help keep your family safe for up to a decade
  • With Safety Check, you can test all your smoke and CO alarms with just a tap and get a full report once the test is done
  • Please refer to the product description section below for all applicable legal disclaimers denoted by the bracketed numbers in the preceding bullet points (e.g., [1], [2], etc.)

Brand: Google


Style: Battery 3 Pack


Power Source: Battery Powered


Color: White


Item Dimensions LxWxH: 5.3 x 1.5 x 5.3 inches


Item Weight: 1 Pounds


Alarm: Audible


Sensor Type: Photoelectric


Brand: ‎Google


Style: ‎Battery 3 Pack


Power Source: ‎Battery Powered


Color: ‎White


Item Dimensions LxWxH: ‎5.3 x 1.5 x 5.3 inches


Item Weight: ‎1 Pounds


Alarm: ‎Audible


Sensor Type: ‎Photoelectric


Manufacturer: ‎Google


Part Number: ‎S3006WBUS


Item Weight: ‎1 pounds


Product Dimensions: ‎5.3 x 1.5 x 5.3 inches


Item model number: ‎06A


Batteries: ‎18 Lithium Metal batteries required. (included)


Is Discontinued By Manufacturer: ‎No


Size: ‎3


Material: ‎Plastic


Voltage: ‎1.5 Volts


Installation Method: ‎Ceiling


Item Package Quantity: ‎1


Display Style: ‎Light Ring with 6 LEDs


Mounting Type: ‎Ceiling


Usage: ‎Inside; Amateur, Inside


Included Components: ‎Six long-life Energizer® Ultimate Lithium "L91" AA batteries; Backplate; Four screws; User's Guide; Welcome Guide; 2-year limited hardware warranty


Batteries Included?: ‎Yes


Batteries Required?: ‎No


Battery Cell Type: ‎Lithium


Date First Available: May 1, 2017


Frequently asked questions

If you place your order now, the estimated arrival date for this product is: May 12 – May 16

Yes, absolutely! You may return this product for a full refund within 30 days of receiving it.

To initiate a return, please visit our Returns Center.

View our full returns policy here.

  • Klarna Financing
  • Klarna Pay in 4
  • PayTomorrow Financing
  • Apple Pay Later
Leasing options through Acima may also be available during checkout.

Learn more about financing & leasing here.

Top Amazon Reviews


  • Installing 8 Nest Protect 2 - Wired version ... in about 90 minutes.
Style: Wired
I have been eyeing the Nest Protect now since it came out about 2 years ago. Like most I simply hate my smoke detectors. Random low-battery chirping, ear piercing function test... getting up on a ladder at least twice a year to change batteries wether they need it or not... you get the idea. My smoke detectors were approaching the 10 year threshold which is the "end of life" for a smoke detector and I knew I would need to be replacing all of them. Fortunately I held off on buying the 1st generation Nest Protect... I've learned to be cautious about these things. After seeing some of the negative reviews around random alarm problems I intentionally delayed purchase until a 2nd generation product was available. With the new Protect 2 out and getting almost universally positive reviews, I went ahead and took the plunge following a 4 year old First Alert CO combination unit dying with 3 chirps every minute at 3:00AM. Good times. My house, like many newer homes, has an insane number of detectors. At the time the home was built there was a requirement for at least one detector on each level of the home, one detector OUTSIDE in the hallway of any bedrooms as well as a detector in every bedroom. For my house that is eight detectors (4 upstairs bedrooms, 2 in upstairs hallway, 1 on main level, 1 in basement). A few years ago it also became code that all of these need to be CO detectors. Cost on the Nest is slightly crazy. I rationalized it with them being rated for 10 years (vs 7 years for the competition) as well as the extra "smart" features being worth the extra cost. In particular the lack of things like low battery chirps, random chirps for errors, etc, was worth an almost 100% premium for me over getting more cheap detectors. Another big advantage we perceived with the Protect was getting an alert if we are out of town or away from our home. I'm also cautiously optimistic more features could be added later to the existing hardware... as Nest already has a track record of doing this with other products (Nest Thermostat added air wave which is a fantastic feature). Quality of these units is impressive. It's hard to believe the box contains a smoke detector when you pick it up as it is so heavy. The unit itself has a very nicely finished case, beautiful lighting and a great big button that can be used for self-tests as well as silencing nuisance alarms (you can also silence alarms from your phone). There is also a nice very solid mounting plate with mounting holes for probably every international junction box imaginable as well as some sheetrock screws if you are installing it in bare sheetrock and a few extra wire-nuts if you need those. The units come with batteries pre-installed... and my understanding is those batteries are good for at least a year or two at which time Nest will warn you that you need to replace them... and it won't do it at 4 in the morning! Do NOT remove the battery activation tab until you are ready to program the Nest Protects! The Protects get programmed BEFORE you install them on the ceiling. This is probably a common source of confusion for home owners since there are numerous little warning tabs/paper trying to warn you against physically installing it before activating it! Here's how I installed my 8 units in a relatively short amount of time (90 minutes total) with some tips that might help you out. Step 1. Take the wrapping off ALL of your Protects boxes. Label each box with a pen for what room/location it is going in. Stack them all up on your left. Sit in a nice clean area (a large table works well). Your not-yet-programmed Protects are on your left, your workspace and mobile device is in the middle and your already programmed protects are on your right... make sure you know your wifi network name & password as well as your mobile having a good solid charge (you're going to be at this for a while). Step 2. Fire up the Nest app, create an account if needed (I already had one for my thermostat). Step 3. Choose "add product" and then choose add Protect. Step 4. Using the mobile app (you need to have a smart phone made in the last 3-4 years or use a PC and type codes in) you scan the QR code on the back of the protect. Don't pull the tab to turn on the protect until instructed! After scanning the QR code, turning on the protect, setting language to English, the app will walk you through the next steps including putting in wi-fi password, setting a location for the device, etc. This all takes at least a couple of minutes, if it sits there for 90 seconds don't give up, it's still working and everything should be fine. The app will want to do a self test of this 1st Protect... this is LOUD so you might want to walk it outside while it is counting down from 10 to start the self test. The app will tell you when setup is done and the Nest Protect will flash to let you know it's programmed. If it is the wired version it will also alert you that it is on battery. Step 5. Keep this 1st Protect out of the box, it will be used to speed up install of the rest of your units. Step 6. If adding additional Protect devices it is important to choose "add another Protect" as this will save you valuable time. Step 7. You will be instructed to scan the QR code of the next Protect and then push the button on the 1st protect to wake it up. Don't pull the tab to turn on the 2nd protect until the app is connected or connecting to the 1st device... you can cheat a bit and pull the tab and choose English language about 30 seconds before the app says to do this and install will go fine... if doing many Protects this saves a bit of time. The Protects don't need Wi-fi to communicate with each other which is why this works... they will use their own wireless to talk to each other and the 1st one you set up can give settings and account info to the other ones. Step 8. Put this 2nd Protect back in its labeled box, move it to the right and go on to your next device. Keep repeating Step 6-7 for each additional Protect you have until all of them are programmed. Once done with all programming move on to physical activation by choosing not to add any more Protects from the app. Important!! Keep the plastic dust cover on your Protects until just before you physically connect it! This will prevent dust/debris from the ceiling from getting into the detector and possibly causing some kind of problem while you are in the process of mucking around at the ceiling doing the wiring. Step 9. Turn off AC breaker to your wired detectors (if your house is newer they are probably all on a single circuit breaker)... remove the old protector and mounting plate and disconnect its wiring harness. Cap the red/signal wire, the Protect doesn't need it. Connect the white/black lead to the Nest wiring harness. Install the new mounting plate.... this is a bit tricky because there are no labels on the plate and its not clear which holes line up with US electrical boxes (pro tip, it's the second most mounting holes from the outside of the plate... use opposing corners of mounting holes for a proper fit). Push all wiring other than the new connector back into the box. Step 10. Connect the newly installed connector to the Nest for that location. Tap the button one time to verify that the detector you are installing is the correct one for that location (you labeled your boxes right?) Step 11. Line up the plastic ring on the mounting plate with the round detent on the Protect. Push slightly as you rotate it and it will lock into place... you are only allowed about 90 degrees to turn the Nest so you might not be able to get the Nest "label" on the button of the protector oriented exactly as you like... it would be nice if Nest let this part rotate freely so that OCD types (me) could get it aligned as they'd like with less effort. Step 12. Repeat above for all detectors and once ALL of them are installed turn your breaker back on. Step 13. Go get a beer. It will take a full minute or two for the Protect 2s to recognize power is connected.... you will notice that a tiny green light comes on when it has AC power for a solid minute or two. Step 14. Tap the test button on any one of the Protects and tap it again to initiate a self-test. This is the cool part as all detectors will now test in sequence without you having to run around with a broom testing each one of them individually. Step 15. You should also now see that the Protects are showing up green on your mobile app. That's my detailed write-up of installation. If it seems too hard (it's not, assuming you can turn a screwdriver, stand on a ladder and understand electrical basics) you can hire a pro... Nest provides info on how to get in touch with one on a flyer in the box. So why 4 stars? A couple of minor things. First off these detectors cost over double what other decent detectors cost. Personally I think a more reasonable price for these would be $79. Certainly Nest should offer a smoke only detector at a slightly lower cost for locations that can't/don't require CO detectors. There are other minor things I think could be improved.... the square design is a pain in the neck to get aligned properly so that it doesn't look crooked on a ceiling... while this won't bother everyone it will annoy enough of us that we will keep mentioning it. Currently Nest does not offer the ability to customize the Protect settings on individual devices. Want the audio test sounds in all rooms other than the room the baby sleeps in? Too bad. Want some way of individualizing Bedroom #1 and Bedroom #2 in the software so you know which one has a problem? Tough. Nest should step up here as they surely know that many homes are going to need a pile of these things and they aren't exactly cheap. My final reason at this time for knocking a star is that a lot of Nest Protect gen 1 owners are left in a lurch... Nest is not offering them discounted Protect 2s and the Protect 1 is prone to false alarms and failures. While I was confident enough in the design of the Protect 2 to spend a whopping $794 on eight of them Nest has left a bad taste in many peoples mouths by not addressing 1st gen problems. If similar problems were to occur several years down the road with the Protect 2 I similarly don't expect much from Nest in the way of a real resolution... even though Nest has been acquired by Google they are the new kid on the block.... they should be really stepping up for their customers instead of responding to negative comments about Protect 1 with "contact customer support". All in all I think that this is a great product that is pricey for what it is. Definitely though it has numerous advantages over traditional smoke/CO detectors and if you think those advantages outweigh the added cost I can certainly recommend it. ... show more
Reviewed in the United States on August 27, 2015 by J. Page

  • This is the only fire alarm worth owning
Style: Battery
We invested in the standard fire alarms with the ten year batteries in them. We thought it was a great investment until they started going off for no reason in the middle of the night. Not the best way to wake up at 3 a.m. One by one, we were replacing them because they kept going off for no reason. Apparently, fire alarms are highly sensitive. You get some dust in there or a spider decides to take a midnight stroll over the alarm... not good. The alarm will go off. We tried cleaning them out with air cans to get rid of any dust and... no luck. So we tried an amazon nest. Guess when it goes off? Only when I cook. Yes, sorry... not the best chef here but at least I know WHY it's beeping and it gives me a polite warning beforehand. Much appreciated. Plus, I can push a button to have it silenced for thirty minutes while I finish preparing food that probably won't taste that great. We started with just one of these and have slowly invested in additional ones to replace the original alarms. WORTH EVERY PENNY and a good nights sleep :) ... show more
Reviewed in the United States on September 20, 2023 by Wendy Cox

  • Easy, Reliable, but crap warranty
Style: Battery
Purchased in 2018. Setup was great. I've had zero issues with it. It keeps me informed about it's status, but doesn't overdo it. Last week, it suddenly told me there was an issue with the sensors and I was unable to get the stupid chirping to stop, even after removing the batteries. I tried removing from the nest app and that didn't work, either. I didn't have time to troubleshoot further, so I stuck it in the garage until I could deal with it today. Wound up figuring out how to do a factory reset (hold button for 10 seconds). I erased all settings and then was able to set it back up on the app with zero issues. Guess the sensors are good after all (let's hope lol) The only reason I give it 4 vs 5 stars is because of the price point this thing carries and the lack of warranty support (2 yrs I believe for a 10 yr product). But I'm 5 yrs in with minimal hassle, so that's saying something at least. I went ahead and bought a 2nd one today to replace the 1985 detector downstairs that constantly complains about my cooking lol. At least I can just his the button to shut this one up haha. ... show more
Reviewed in the United States on September 6, 2023 by Chris

Can't find a product?

Find it on Amazon first, then paste the link below.