Search  for anything...

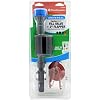
Fluidmaster 402CARHRP14 PerforMAX Universal High Performance Fill Flapper Repair Kit for 2-Inch Flush Valve Toilets, Easy Install, Multi Color

  • Based on 24,029 reviews
Condition: New
Checking for product changes

Buy Now, Pay Later


As low as $3 / mo
  • – 4-month term
  • – No impact on credit
  • – Instant approval decision
  • – Secure and straightforward checkout

Ready to go? Add this product to your cart and select a plan during checkout. Payment plans are offered through our trusted finance partners Klarna, PayTomorrow, Apple Pay, and PayPal. No-credit-needed leasing options through Acima may also be available at checkout.

Learn more about financing & leasing here.

Selected Option

Free shipping on this product

This item is eligible for return within 30 days of receipt

To qualify for a full refund, items must be returned in their original, unused condition. If an item is returned in a used, damaged, or materially different state, you may be granted a partial refund.

To initiate a return, please visit our Returns Center.

View our full returns policy here.


Availability: In Stock.
Fulfilled by Amazon

Arrives Friday, May 3
Order within 17 hours and 13 minutes
Available payment plans shown during checkout

Style: 402CARHRP14


Features

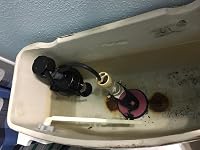
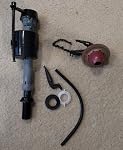
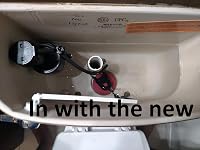
  • PREMIUM TOILET PERFORMANCE: Toilet fill valve and flapper repair kit fixes common toilet problems such as running, leaking, noisy, ghost flushing or weak flushing
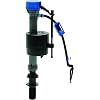
  • UNIVERSAL DESIGN: PerforMAX toilet fill valve adjusts easily from 10 15 inches and is ideal for use in 1.6 gallons per flush toilets
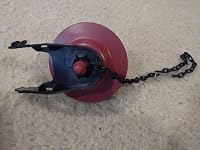
  • CORROSION RESISTANT: Chlorine and hard water resistant, PerforMAX 2-inch flapper features corrosion-resistant Microban material to prevent breakdown and leaks due to bacteria
  • 7-YEAR WARRANTY: This product has a 7-year warranty
  • DURABLE: Solid frame flapper eliminates twisting and ghost flushing for optimal performance

Description

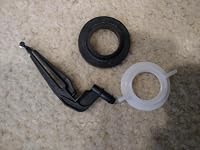
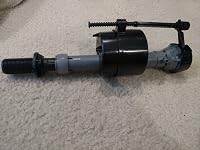
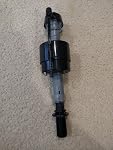
Style:402CARHRP14 Designed with high-performance in mind, the Fluidmaster 402CARHRP14 PerforMAX Universal High Performance Toilet Fill Valve and Flapper Repair Kit is the solution you need to make your toilet run like new. The premium PerforMAX toilet fill valve features a height adjustable valve shank design to adjust between 10 – 15 inches, while the PerforMAX 2-inch water- saving flapper adjusts to maximize water usage with each flush. Perfect for a DIY upgrade with its fast and easy installation, the universal design fits most 2-inch flush valve toilets and works best with 1.6 gallons per flush toilets to help solve most common toilet fill problems. The Fluidmaster 402CARHRP14 PerforMAX Universal High Performance Toilet Fill Valve and Flapper Repair Kit comes with a 7-year warranty.


Manufacturer: ‎Fluidmaster


Part Number: ‎402CARHRP14


Item Weight: ‎13.4 ounces


Product Dimensions: ‎6.25 x 3.88 x 14 inches


Country of Origin: ‎Mexico


Item model number: ‎402CARHRP14


Is Discontinued By Manufacturer: ‎No


Color: ‎Multi color


Style: ‎402CARHRP14


Item Package Quantity: ‎1


Water Consumption: ‎1.6 Gallons per Flush


Included Components: ‎Toilet Fill Valve and Flapper Kit


Batteries Included?: ‎No


Batteries Required?: ‎No


Date First Available: April 9, 2016


Frequently asked questions

If you place your order now, the estimated arrival date for this product is: Friday, May 3

Yes, absolutely! You may return this product for a full refund within 30 days of receiving it.

To initiate a return, please visit our Returns Center.

View our full returns policy here.

  • Klarna Financing
  • Klarna Pay in 4
  • PayTomorrow Financing
  • Apple Pay Later
Leasing options through Acima may also be available during checkout.

Learn more about financing & leasing here.

Top Amazon Reviews


  • Easy and Affordable DIY Solution to Leaking or Noisy Toilet
Style: 400CRP14
I purchased this Fluidmaster Toilet Fill Valve Kit to replace the original fill valve that came with my toilet (14 years old). I had previously replaced the flapper a few times, but this time the entire fill valve was shot (Noisy, leaking & running). My water bill was running about $5 higher than normal, so this new fill valve will pay for itself in less than 2 MONTHS! The install was extremely easy; taking only about 15 minutes. The included directions are easy to follow; no tools are necessary unless the existing lock-nut that is under the toilet is a bit seized. Before installing or removing any parts, turn off your water pressure at the toilet and flush your toilet to remove as much water as possible from the tank. Any remaining water can be soaked up and removed with a sponge. I always get a small bowl, or use an old towel under the toilet to capture any other small amounts of water once I remove the nut that holds the valve stem. The new valve kit and flapper easily attached to the flush arm and fill pipe. This is a very inexpensive and straight forward DIY project. Like most Amazon shoppers, I count on honest, unbiased reviews. I hope you have found this review helpful in making your purchase decision. ... show more
Reviewed in the United States on April 10, 2017 by Sarasota2k4

  • Was leaking, but I figured out the issue. You can too!
Style: 400CRP14
Lasted about 6 months before the valve started leaking, Verified flapper seats properly. Then replaced it anyway. Tried inspecting, cleaning and flushing the valve seat as per the video. No help. Runs slowly but continuously through the 1/8" plastic refill tube. Then I discovered the following: If the plastic refill tube length extends down lower into the pipe than the full water level, this will create a siphon effect that will make water flow slowly through the refill tube and create the impression of a leaky valve. Do NOT reuse the existing refill tube, even if it appears to be OK. Use the supplied refill tube AND supplied mounting clip, and trim the tube length if needed. This will ensure that the refill tube doesn't siphon the tank and make the valve open. Look in the bowl and ensure that you don't see any water flow. I thin the valve design should prevent this, but it does not. ... show more
Reviewed in the United States on April 1, 2018 by JimBoCoUs

  • Finally no more leaky toilets & no more annoying humming noise
Style: 400CRP14
What a huge relief finally no more leaky toilets around the house. Install took about 20 minutes including the removal of the old valve system, key thing to remember is to make sure you have teflon tape to seal the water line make sure the float mechanism has clearance to go up and down smoothly. I would recommend just testing the system before you put everything back together. ... show more
Reviewed in the United States on October 15, 2016 by Shamwow

  • Usually works but valve periodically sticks open
Style: 400CRP14
I bought this to replace a fill valve that was dripping into the tank. Our home was built 11 years ago and we've lived here for 9 years. This replacement was easy to install and seems like it does a reasonably good job of filling the tank and cutting off flow properly. I do have a gripe with it, though. At the top of the fill valve there is a filter to prevent small bits of debris from passing through the valve. The problem I've had - three times now - is that when those tiny bits of debris are caught by the filter it locks the valve open and the water continually runs. The only way I have found to correct this problem is to pull the top of the tank, unscrew the valve assembly, use a knife or pick to remove the contaminant and then reassemble the valve. Not difficult, but not something I've ever had to do with previous fill valves in this house for the past 9 years. Having to do it three times in the two and a half months since installing this valve is less than ideal. ... show more
Reviewed in the United States on February 1, 2016 by BDS

  • Quick Easy and Simple
Style: 402CARHRP14
I purchased this to fix a toilet that was constantly "running". After spending an hour messing with the original components, I decided to bite the bullet and replace the parts. Before going further, know that the MOST I've done with a toilet is removed the lid and jiggled the chain until it "fixed" itself. So prior to this week, I knew very little about repairing or replacing the parts of a toilet's tank. Upon opening the packaging, I went straight to the instructions. I REALLY didn't want to screw this up and possibly have a non-working toilet. I'm happy to say that the instructions included pictures/images and text and were very easy to follow. Truthfully, there were a couple of instances where I thought it was too easy and went forward without referring to the plans -- bad move that led to confusion. But going back to the instructions quickly fixed this. I got the old components out and new components in within 15 minutes. I then spent the next 5 minutes adjusting the flush amount and water capacity. Truthfully, I could have stopped at the 15 minute mark and been OK, but when you invest in components that are designed for efficiency and saving water, you spend the extra 5 minutes trying to get your money worth. Once everything was installed to my liking, I looked at my watch and was surprised how quickly I'd done everything. I was quite surprised. The unit it's terribly loud nor is it super quiet. It's roughly the sound level of your average toilet, maybe slightly quieter, but nothing that's going to draw attention or make you say "that's quiet". The tank does have the option to quickly fill. Though it's worth noting that a quick fill will result in more noise as more water rushed into the tank. Opting for a slow fill gives you a quieter experience but the noise lasts longer. I set my flow to roughly 7. This gave a slightly quieter experience while still fairly quickly filling up the tank. The flusher also has a setting that dictates how much water going into the bowl. Again it's worth playing around with. Out of the box, this was set to Max. I tried Minimum and was disappointed when the toilet could barely flush more than a few sheets of toilet paper. I found my sweet spot to be 6, but pushed it up to 7 for those super emptying out bathroom experiences. I won't mind changing the water flow on the fly, but the bowl fill is one I won't like because I'll have to reach to the bottom of the tank to do so. So it's been stated, I did not need to cut or glue anything together. I saw other comments mentioning cutting. The unit increases and decreases in height where needed so I'm not even sure what one would have to cut or chop unless they wanted to over-complicate a simple situation. I also recall a comment about the unit pushing the top off the toilet. Again, HOW?! There are no springs. The you twist the unit to change the height. It's like a screw system, there aren't any springs and the floating sinks beneath the water level with very little weight so that couldn't push the top off the toilet's tank. In short, this is an all in 1 unit and it's quite easy to install and there's really no reason to over thinking. The two points I mentioned earlier made me hesitate to purchase the unit, but after purchasing the unit, I'm led to believe the others may have confused this unit with another. Nothing to cut and no springs to push up the lid. Just a simple yet effective system. Ultimately, I am happy with the unit as a whole. I was definitely a bit intimidated, but now feel confident tackling this again if necessary. I'd TOTALLY recommend this product. ... show more
Reviewed in the United States on July 27, 2020 by Buster

Can't find a product?

Find it on Amazon first, then paste the link below.